Update: As many of you have pointed out, this procedure doesn’t work well with newer versions of KitKat (4.4.1+) or Lollipop (5+). A lot has happened with the Android OS since the publication of this article and it’s likely that workarounds like these have been patched or deemed obsolete. Given that I no longer have my KitKat phone to replicate issues, I can’t give out more advice in the comments like I used to but the answers already here and other users’ comments may help you out.
If you’ve been using Android for a while you might have found out that the Android 4.4 (KitKat) update strips your possibility to write data directly to the SD card. This limits you to using the internal memory which you may already know can fill up pretty fast. You have the option of rooting your device but that process is a bit complex and carries the risk of bricking your device or at the very least voiding your warranty.
Some have reported that there are ways around this by installing some third-party apps that circumvent the issue but I tried them and they didn’t work for me. Also, I tend to prefer more solid solutions that don’t rely on more apps to the things that the phone should do by itself.
A little preparation
Like any good recipe, you’re going to need some basic ingredients. This is going to require that you download the Android SDK Tools which might seem scary if you’re not a developer but it’s actually a very quick process and you’ll feel like a pro when you’re done. When you visit the link above make sure to select your appropriate platform from the SDK Tools Only section. If you’re using Windows, make sure to download the ZIP version, not the EXE. Once the download finishes, unzip the package to a location of your choosing.
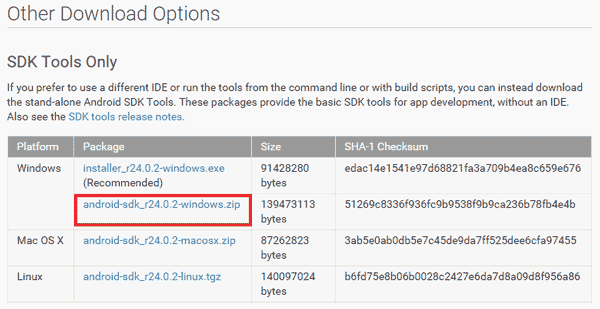
Select this link if you’re using Windows.
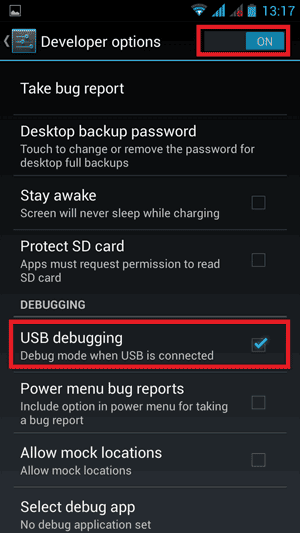
The next thing you’ll need to do is enable Developer Options on your Android device. The short version of how to do that is to go into System Settings, select About Phone, and then tap Build Number seven times. You can check out my post on How to enable Developer Options on Android for more detailed instructions and screenshots.
Step One
Make sure that Developer Options are enabled on your Android device and that the USB Debugging option is marked.
Connect your phone to your PC using the USB cable. If it’s the first time you’re doing this, make sure to wait while all of the drivers are installed automatically. When that’s done, make sure you set your Android connection to “Charge Only”, or anything other than “USB Storage”.
Step Two
Open up the Android SDK folder you unzipped. If you do not see a platform-tools folder then you’ll need to open the SDK Manager application. It will retrieve a list of the necessary packages in order to use the tools you need. From the list make sure to select Android SDK Platform Tools. All the rest are optional. Once you select the appropriate packages, click on Install packages, accept the terms and click on Install again.
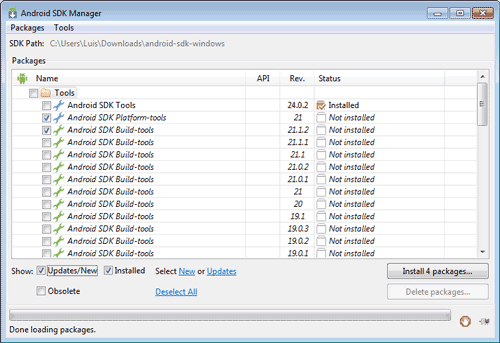
Android SDK Manager package selection screen.
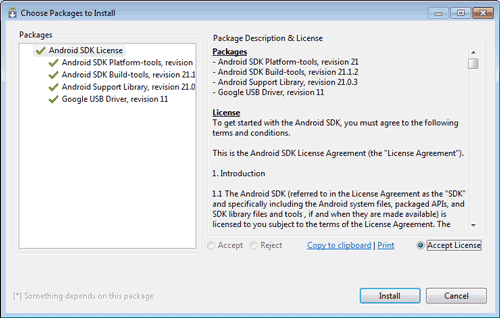
Android SDK install package confirmation screen.
Step Three
Now you should see the platform-tools folder. If you’re on a Mac then just right-click on the platform-tools folder and select “New terminal at folder”.
If you’re on Windows open up the platform-tools folder and from there press Shift and then right- click and select “Open command window here”.
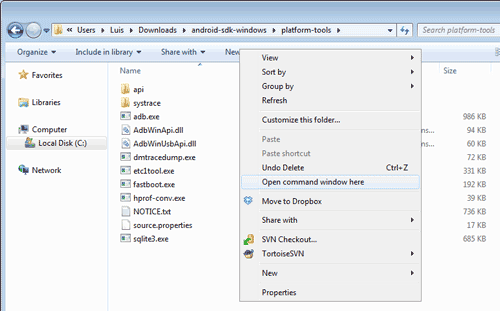
Open command window in this folder.
Step Four
A command window will pop up. Type in the following commands:
For Windows: adb devices

For Mac: ./adb devices
You should see the name of your attached Android device right under. If it shows up, type in the following:
For Windows: adb shell pm set-install-location 2
             adb shell pm get-install-location

For Mac: ./adb shell pm set-install-location 2
         ./adb shell pm get-install-location
If you did it right the final output in the console window should say: 2 [external]
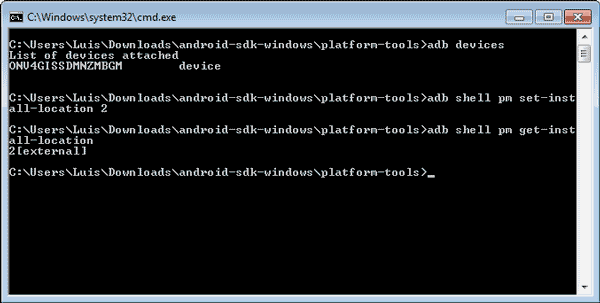
Your command terminal should look like this at the end.
That’s it! You are now able to write all your data or apps directly into your SD card and take advantage of all that extra space. Enjoy!
Thank you so much 😀
You’re very welcome.
Hi, Every time I use /adb shell pm set-install-location 2 it reads “Error: java.lang.securetyExeption: package android does not belong to 2000”
I have de same problem “Error: java.lang.securetyExeption: package android does not belong to 2000”
my Device is a Samsung Galaxy Tab A. Android Ver. 6.0.1
@Efra, @Agus, @Naieem, @Jose:
I wrote an update at the top of the post indicating that these instructions don’t apply to newer versions of Android (including KitKat 4.4.1+ and Lollipop 5+). The issues you’ve all reported correspond to these newer versions and unfortunately it doesn’t allow this workaround for security reasons.
Hi luis. Thanks for the tutorial. Am not and expert and such processes freaks me out. I tried looking this process up. But i ended up that this solution will make the phone install apps on the sd card directly. I am not sure if this is related to the sd card restrictions done in kitkat but i really dont wanna install apps on the sd card directly.
Any idea?
Also just saying, u should mention that this will make the device install apps directly on the sd card..
Thanks for the post and effort and waiting for ur reply
Hi hoppa,
I’m glad you found the tutorial useful. Like you read, this procedure will have apps and data installed directly on the SD card. If you’re not comfortable with that setup (for performance reason), you can always revert to using the primary storage location by using the command:
adb shell pm set-install-location 1Cheers!
It’s reversible? Great. Thanks for replying.
Hello! Finally, is it a way through ADB Shell to enable writing to SD (e.g copy, delete,rename) WITHOUT setting apps’ default install location to SD? Thanks in advance..
I successfully completed your tutorial, Thank You! After completion however I downloaded a new app (MS One Note) and it didn’t appear to be installed on the external SD card. Should it write to external SD by default or should I be presented with option to write? Thoughts please?
Arby
Apps will be installed on the SD Card by default, however there are some apps that are set to install on the device’s memory. You can choose to transfer these apps to the SD Card through the App Manager. From the App Manager you’ll see an SD Card tab and it’ll show which apps are on it already. Click on an app for more details and you’ll see a “Move to SD card” button.
Luis.T why i cant open SDK manager after i unzip it? should i download exe if zip doesnt work? Waiting for your reply. Thanks
@JamesEdward: Yes. If you’re having trouble unzipping the package, try downloading the executable.
I also went through everything and tried to install a program and it saved to my main storage. I restarted and tried again and now nothing will save at all. It tells “Insufficient storage space” when there is more than enough on both the internal storage and the external.
I’m wondering if it’s trying to save to the SD card and it’s not allowed to and that’s the only message it knows to give.
(I’m having a hard time getting it to change back to defaulting to the internal storage, too)
Is there something else I could try?
@Sandra: I’ve noticed since I published this article that there have been some changes to how Android apps are installed on the device. It seems that some apps carry instructions that they must be installed on the phone’s memory and not external memory. For these cases, most of the time you can transfer them (at least partially) to the SD Card through the App Manager.
Having the same problem Sandra is… now nothing will install.
Hi Richar, if you’re finding that apps aren’t installing at all, I recommend you follow the steps to revert to the main installation point. In Step 4, instead of choosing install-location 2, set it to install-location 1.
Hi! I can’t get connection to “Charge Only” on my Samsung Gt-5200 – only USB Storage. Can you help me for this?
@estenha: When your phone is connected to your computer, unlock it and pull down the top tray and tap on the USB notification. It should give you an option to stop USB Storage mode.
How do I know it worked? It showd it worked on my terminal screen. But i still cant download apps to the sd card. What am i missing?
@Mike: Please read my response to Sandra. The short version is that some apps are configured to install directly on the main memory but can be transferred to the SD Card through the App Manager on your Android.
Hi, I’m following your tutorial; however on step 4 it doesn’t list my phone. It is connected to the computer as ‘charge only’. Any help?
@Lee: In Step Two, make sure that you downloaded the packages that correspond to your device’s version. It’s possible that it doesn’t recognize your phone because you don’t have the developer package for that version.
@Luis T: Thanks a lot for replying. My computer still does not recognize my phone. I am using a phone with Android 4.4.2 In the phone properties it states also “Custom build version: Wiko Sunset2 Version 8”. From the list displayed in the Android SDK Manager, I have already installed the ANdroid SDK Tools (Rev 25.1.1), Android SDK Platform-tools (Rev. 23.1), Android SDK Build-tools (Rev. 23.0.3), and from Android 4.4.2 (API 19), the SDK Platform is installed, but nothing from the rest of the menu under this version (i.e. ARM EABI v7a System Image, etc). Do I need to install all the other things listed under the Android 4.4.2 in the SDK Manager? I am very new to all this and I’m not sure what all these things mean. Thanks for your help.
Luis, I really want to write to SD card but command line says that “adb” is not a recognized command. Any ideas?
Hi Bandit, you need to include the path to your adb.exe file in the system’s PATH variable. To do this, first locate where your adb.exe file is located on your computer (probably “C:\Program Files\Android” or something similar). Then open a command prompt and type in the following:
set PATH=%PATH%;”C:\Program Files\Android”
You should now be able to run adb properly.
I have a dual boot Android 4.4 / Windows 10 tablet. Newly released product, and therefore I don’t understand why it’s delivered with Android 4.4? Anyway, Out of 32GB internal storage 10GB is for Android and 20GB is for Windows. I bought a 64GB microSD card, formatted this 32GB Fat32 primary and 30GB EX4 primary partitions.
When I use adb shell pm set-install-location 2, Android does not use the 32GB Fat32 partition for new apps, but I can read and copy files to it.
When I use adb shell pm set-install-location 3 nothing happens. Android will not use it to store new apps.
@Mark: Something I’ve noticed is that several apps are coded in such a way that even if your phone is configured to install apps on external media, they’ll still install on the phone’s memory by default. What you can do is go to your App Manager and transfer the apps to the SD Card from there. It’s not ideal but at least it’s a solid workaround.
Good luck!
if i do all this will it make apps to make directories to save their data on sd card?
@Asad: After doing this you might have to transfer some apps manually to the SD Card through the App Manager, but the default install location should change to the SD Card for future installations.
samsung galaxy tab e isn’t recognized. usb debugging is on and there isn’t any option to use the charge only option when usb is connected. any thoughts?
does not work, i.e. nothing will install now, as kitkat 4.4.4 will ONLY install to main storage, so nothing will install. will have to revert. thanks anyway.
Hi there
I’m running Android 5.1 (dual boot tablet) so I don’t know if things have changed since 4.4 but I am getting an error I can’t get around.
‘adb shell pm set-install-location 2’ command gives me the error ‘java.lang.securityexception: package android does not belong to 2000
the second command ‘adb shell pm set-install-location’ returns ‘0[auto]’
I just want to get DroidTV to record on my External SD Card. I would like installed apps to remain on the internal memory.
Anyone had these problems with Android 5.1? Any solution?
Hi Luis,
I followed all the directions above and I got the output I was supposed to. However, when I try to move applications to my (nearly empty) SD card, I still get the same notice that they can’t be moved. One of these apps is one I KNOW was able to be installed to the SD card prior to the release of Android 4.4. Is there a workaround for this issue?
Thanks
Im having this error:
\android-sdk-windows\platform-tools>adb shell pm set-install-location 2
WARNING: linker: libvc1dec_sa.ca7.so has text relocations. This is wasting memory and is a security risk. Please fix.
WARNING: linker: libvc1dec_sa.ca7.so has text relocations. This is wasting memory and is a security risk. Please fix.
Any help?
I have the same issue as Mark, probably a similar tablet situation. It’s an Onda v919 DualBoot, and it has an intel processor, so rooting it has been very difficult. Your instructions work perfectly fine, and the get-install-location command shows that it should be installing apps to the external card, but it does not. In fact, it won’t install apps at all– I just get an error message that there isn’t sufficient storage space. No option ever comes up in App manager that allows you to transfer apps to external storage, no matter what the app is. I know which ones CAN be moved because I am able to move them to external on my other Android devices– it just simply does not work with an Intel-based tablet.
I want to enable writing to SD (e.g copy, delete,rename) WITHOUT setting apps’ default install location to SD
Can u help me out?
Asking for Lenovo A1000 model (Android Lollipop)
Regards
When I try command “adb shell pm set-install-location 2”
I read notification “Error: java.lang.securetyExeption: package android does not belong to 2000”
What should I do…?
Hi Luis,
I followed the instructions given by you, and faced no issues at all.
Still none of my apps are able tow write on the SD card on my LG E-988 phone.
Followed instructions : all seemed to work
Acer B1-10
Android 4.4.4
Will not move apps to sd
does not show in apps mode
Am I sol