Intro
First off, let me say that I’m a big fan of Bluehost. I’ve been hosting several websites with them for about two years now and haven’t run into a single problem. When I first started setting up my sites there I wanted to bring in some of my older sites onto Bluehost. I had already gone through a few other domain name and hosting services in the past so some of my older domains were still registered with other providers.
In order for me to manage all of my sites directly on Bluehost, I had to do a little domain magic to get things working properly. Don’t worry, the process is quite easy and the guide here will show you all the steps necessary to set up a new or existing website on Bluehost with an external domain.
Step by Step
Configuring the Remote Domain Name
The first thing that needs to happen is you need to point your domain name to Bluehost’s domain name server. This might sound like a very technical and complicated process but it’s quite easy.
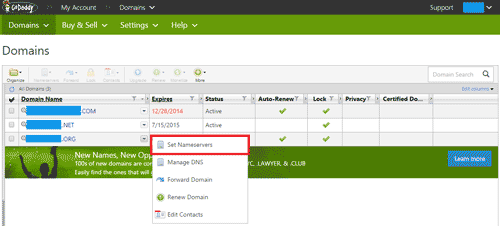
#1 – Log into the hosting site where you registered the domain and go to your domain manager (I’ll be using GoDaddy as an example since it’s one of the most widely used registrars).
#2 – From there select the arrow next to the domain name you want to handle in Bluehost and click on Set Nameservers. Other sites will have similarly named options. You need to get to the Nameservers section for your domain.
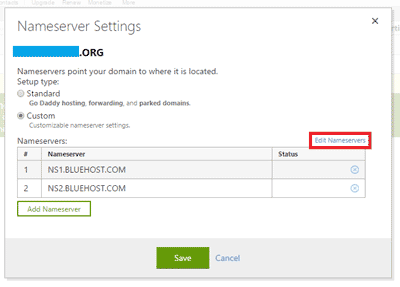
#3 – Next you need to edit your nameservers so that they point to NS1.BLUEHOST.COM and NS2.BLUEHOST.COM. Once this is done, save the changes and your domain name will now be ready to be managed by Bluehost.
Configuring the Domain Name on Bluehost
If you’re following this guide you should already have a hosting account with Bluehost at this point. Now we’ll be verifying ownership of your domain in Bluehost to set it up with a new or existing site.
#1 – Once you’ve set up your Bluehost hosting account, log in and head over to the Domains section and click on the Assign subsection.
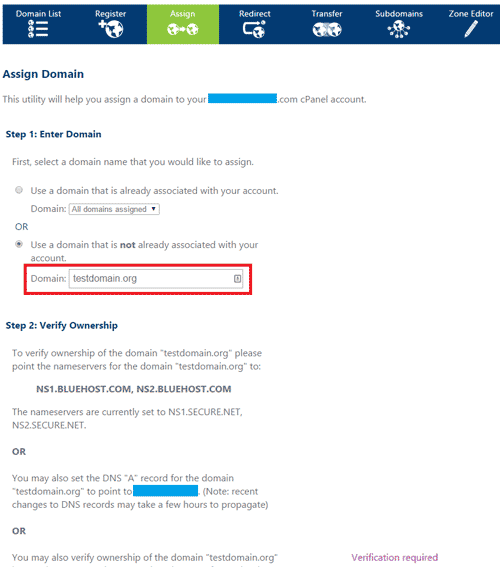
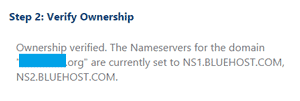
#2 – Enter the domain you modified in the first part into the input box in on screen. Bluehost will automatically proceed to verify your ownership of this domain. Since you already pointed it to the Bluehost nameservers it should show up as verified. If it doesn’t you might have to wait a while for the changes to propagate.
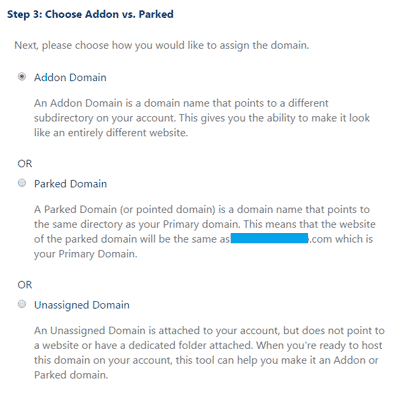
#3 – You then have three options for how to handle your new domain. Addon domain let’s you link it to a new website on your account, Parked domain points it to the Primary site on your Bluehost account (acting like a secondary URL for your main site), and Unassigned just stores the domain name on your account without pointing it to anything. You’re most likely going to want to choose Addon domain.
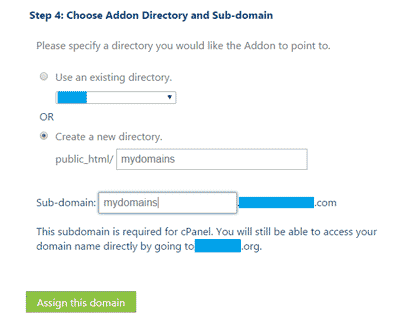
#4 – In the final step select Create new directory and give it the same name as your domain in both input boxes. Once that’s complete click Assign this domain and you’ll be able to see your new domain in Bluehost’s Domain List page.
Next Steps
With your domain now managed within Bluehost and assigned to a subdirectory in your hosting account, you can proceed to create a new website for it. You can do this by uploading your HTML files to the subdirectory you just created (/public_html/[your_domain_name]/) or by creating a new WordPress site and selecting the new domain as its URL.
If you have any trouble setting up your domain name on Bluehost just leave a comment below or get in touch with me through Facebook or Twitter, and I’ll be glad to lend a hand.
These are excellent steps! It’s a brilliant step by step guide with lots of useful information! Thanks for sharing it.
Eagerly waiting for more posts!!
Best wishes! 😀
Thank you, Srijan. I’ll have some more posts up soon. Keep checking back!
Glad someone did a decent write up on Bluehost… I have used them and they are really solid and intuitive… nice one 😉
Thanks, Steve. Bluehost definitely has one of the easiest user interfaces out there. I’m very happy with them.
Hey thanks for the info. I’ll definetly consider bluehost for my next site.
-Dan
Good choice, Dan. If you need any help setting it up, let me know.
Cheers!